iNQUIRE Installation v1.3 28/02/2019
0. Contents
1. Prerequisites
- Microsoft Windows Server 2008 R2 Standard 32bit or (?)64bit
- Microsoft SQL Server 2008 R2
- Microsoft SQL Server Management Studio 2008 R2
- Microsoft Web Platform Installer 3.x+ http://www.microsoft.com/web/downloads/platform.aspx
- UNIX compatible text edititor, eg TextPad http://www.textpad.com/download/index.html
2. Download and Installation of Components
2.1 Microsoft IIS v6/7/7.5
- http://learn.iis.net/page.aspx/29/installing-iis-7-and-above-on-windows-server-2008-or-windows-server-2008-r2/
- Tick "Application Development -> ASP.NET"
-
Role Services:
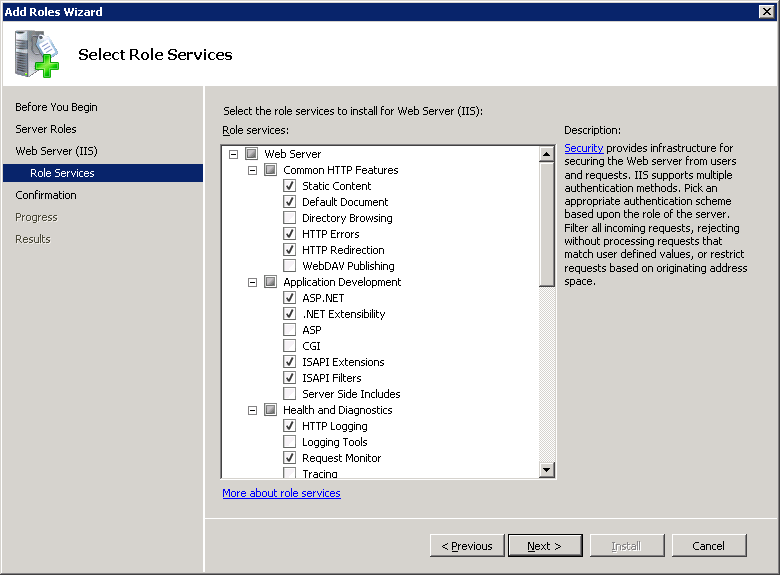
- [* Untick "Common HTTP Features -> Directory Browsing"]
- [* Note: Install only the absolutely necessary IIS services to minimize the IIS installation footprint and also minimize the attack surface]
- Click start, right click "Command prompt", select "Run as administrator"
- Change directory to Microsoft.net Framework directory, either eg "C:\Windows\Microsoft.NET\Framework" on 32bit systems, or eg "C:\Windows\Microsoft.NET\Framework64", change directory to "v4.0.30319"
- Type "aspnet_regiis -ir", hit enter, ASP.NET 4 should be installed
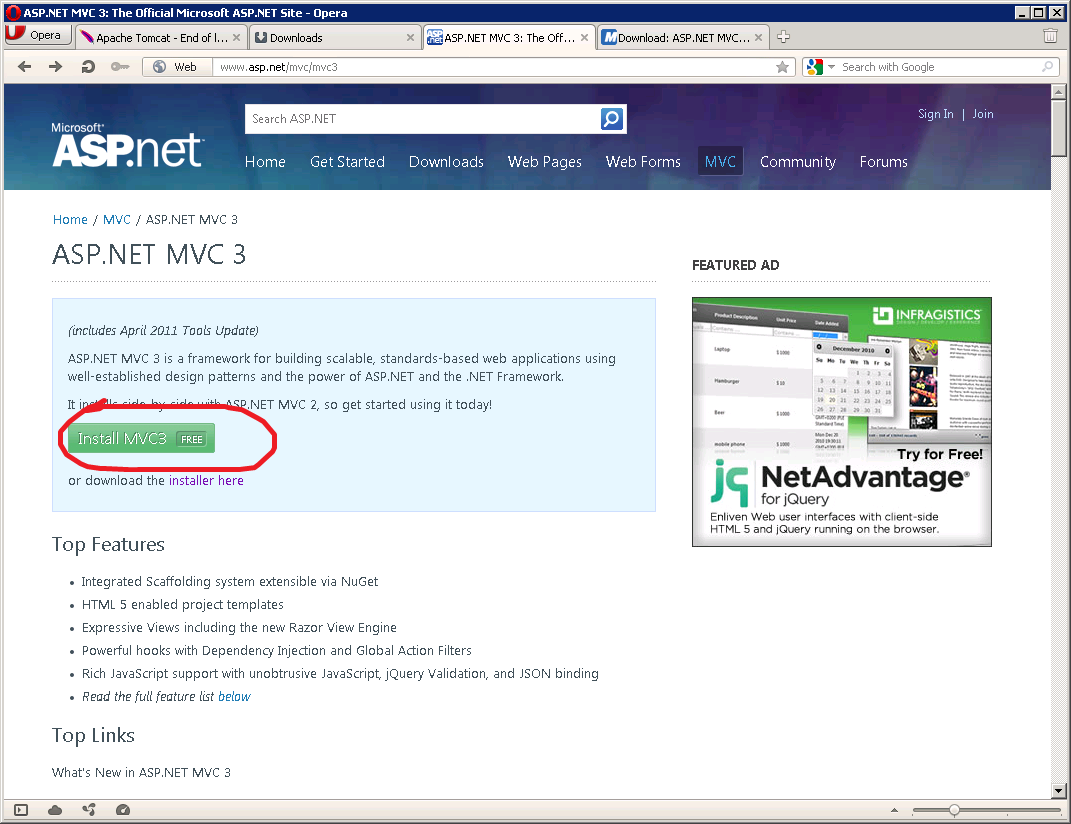
2.2 Microsoft ASP.NET MVC3
2.3 Java SE 7u67+ 32bit
2.4 IIP Image Server
- http://iipimage.sourceforge.net/download/
- Installation instructions can be found on the IIP Image Server site http://iipimage.sourceforge.net/documentation/server/
- Detailed instructions for installing on Windows Server IIS can be found here http://iipimage.sourceforge.net/2011/08/installing-iipimage-on-iis7/
2.5 Apache Solr 4.10.0
- http://www.apache.org/dyn/closer.cgi/lucene/solr
- Copy contents of "example" directory to path with no spaces in name, eg "C:\solr"
2.6 iNQUIRE
- If you have been supplied precompiled web deployment files then you can skip this step, else if compiling iNQUIRE from source code it must be compiled with reference to correct data object class (derived from InqItemBase), currently in use InqItemBod (for Bodleian) and InqItemArmNode (for BL Crimea test data), use these as example of how to build your data object class (which maps your Solr fields to C# object properties):
- Global.asax.cs:
Startup.Init<InqItemBod>(ConfigurationManager.AppSettings["SolrUri"]); - SolrRepository.cs
        private static ISolrOperations<InqItemBod> _solr;
        private static ISolrOperations<InqItemBod> Solr
        {
            get
            {
                if (_solr == null)
                    _solr = ServiceLocator.Current.GetInstance<ISolrOperations<InqItemBod>>();

                return _solr;
            }
        }
protected SolrSearchResults makeSolrSearchResults(SolrQueryResults<InqItemBod> results) { ... protected SolrSearchResults makeSolrSearchResults(SolrQueryResults<InqItemBod> results, List<KeyValuePair<string, string>> facets, List<FacetRange> facet_ranges) { ...
- Global.asax.cs:
- Unpack latest build (eg 1.13) to chosen deployment directory, eg "C:\ASPSites\inquire\1.13"
- Edit Views\Discover\Print.cshtml to match object metadata fields
- iNQUIRE must be compiled to match the JPEG2000 image server being used (currently supported Djatoka, IIP Image Server)
- iNQUIRE.Controllers.DiscoverController.cs
public class JP2HelperModule : NinjectModule { public override void Load() { Bind<Helper.IJP2Helper>().To<Helper.IIPImageHelper>(); // Bind<Helper.IJP2Helper>().To<Helper.DjatokaHelper>(); } } - Edit JPEG2000 Image Server Settings in Web.Config:
<!-- JPEG2000 Image Server Settings --> <!-- Use thes settings with IIP Image Server --> <!-- <add key="ResolverUri" value="http://62.49.109.149/imageserver-test/iipsrv.fcgi" /> <add key="ViewerUri" value="http://62.49.109.149/imageserver-test/iipsrv.fcgi" /> <add key="ProxyResolverFile" value="resolver.iip" /> <add key="Jpeg2000NamespaceReplace" value="info:arm/test/" /> <add key="Jpeg2000Namespace" value="crimea/" /> <add key="ImageFilenameAppend" value=".jp2" /> <add key="DeepZoomQueryParameter" value="DeepZoom" /> --> <!-- End: Use thes settings with IIP Image Server --> <!-- Use these settings with Djatoka --> <add key="ResolverUri" value="http://62.49.109.149:8080/adore-djatoka/resolver" /> <add key="ViewerUri" value="http://62.49.109.149:8080/djatoka-viewer/viewer.html" /> <add key="ProxyResolverFile" value="resolver.dja" /> <add key="Jpeg2000NamespaceReplace" value="" /> <add key="Jpeg2000Namespace" value="info:arm/test/" /> <add key="ImageFilenameAppend" value="" /> <add key="DeepZoomQueryParameter" value="rft_id" /> <!-- End: Use these settings with Djatoka --> <add key="DjatokaHome" value="F:\Clients\iNQUiRE\inquire_working\iNQUIRE\iNQUIRE\djatoka" /> <!-- required if using Djatoka and require jpeg2000s to be created on the fly from non-jpeg2000 original source images --> <add key="DeepZoomViewerFile" value="viewer.dzi" /> <!-- end: JPEG2000 Image Server Settings --> - Edit the handlers section in Web.Config, comment/uncomment the two lines which refer to IIPImageServer/Djatoka as needed:
    <handlers>
      ...
      <!-- <add name="DjatokaHandler" path="*.dja" verb="*" type="DjatokaIIS.DjatokaHandler" resourceType="Unspecified" preCondition="integratedMode" /> -->
      <!-- <add name="DeepZoomHandler" path="*.dzi" verb="*" type="DjatokaIIS.DeepZoomHandler" resourceType="Unspecified" preCondition="integratedMode" /> -->
      <add name="IIPImageHandler" path="*.iip" verb="*" type="IIPImageIIS.IIPImageHandler" resourceType="Unspecified" preCondition="integratedMode" />
      <add name="DeepZoomHandlerIIP" path="*.dzi" verb="*" type="IIPImageIIS.DeepZoomHandlerIIP" resourceType="Unspecified" preCondition="integratedMode" />
      ...
    </handlers>
- iNQUIRE.Controllers.DiscoverController.cs
- Edit Web.config to set user security settings, eg minimum password length:
    <membership defaultProvider="SqlProvider" userIsOnlineTimeWindow="15">
      <providers>
        <add name="SqlProvider" type="System.Web.Security.SqlMembershipProvider"
             connectionStringName="SqlServices"
             applicationName="iNQUIRE"
             enablePasswordRetrieval="false"
             enablePasswordReset="true"
             requiresQuestionAndAnswer="false"
             requiresUniqueEmail="true"
             passwordFormat="Hashed"
             maxInvalidPasswordAttempts="5"
             passwordAttemptWindow="10"
             minRequiredPasswordLength="3"
             minRequiredNonalphanumericCharacters="0" />
      </providers>
    </membership>
2.7 Microsoft IIS URL Rewrite
[Optional, used eg for short Urls direct linking to individual items (eg Url field in an Xml/Ris export)]
3. Configuration
3.1 Environment Variables
Click "Start -> [Right Click] Computer -> Properties -> Advanced System Settings -> Environment Variables"
3.1.1 User Variables for [user]
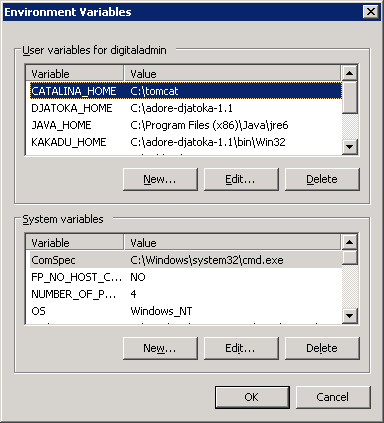
- New user variable JAVA_HOME set to JRE installtion directory eg "C:\Program Files (x86)\Java\jre7"
- New user variable SOLR_HOME set to solr multicore installation directory eg "C:\solr\multicore"
- Restart computer
3.2 Sql Database for User Data and User Generated Content (Notes, Collections, etc)
- If you have a bacpac file and are using an Azure database please follow the guide here to restore the iNQUIRE database. You can use your Azure database username and password in your database connection string in web.config (or in ConnectionStrings.config if you are working from source code and not deployment files), the rest of this section can be skipped, jump to "3.3 Solr".
- If you have a dacpac file and are using Sql Server Management Studio or similar please start from step 1.
3.2.1 Sql Server Configuration
- Click start, run Sql Server Configuration Manager
- Expand "SQL Server Network Configuration" in left hand pane
- Highlight "Protocols for MSSQLSERVER", make sure "Shared Memory", "TCP/IP" enabled
- Expand "SQL Native Client xx.x Configuration"
- Highlight "Client Protocols", make sure "Shared Memory", "TCP/IP" and "Named Pipes" are all enabled
- Repeat for 32/64 bit instances as needed
- [*Run "OpenSqlServerPort.bat" as administrator from command line]?
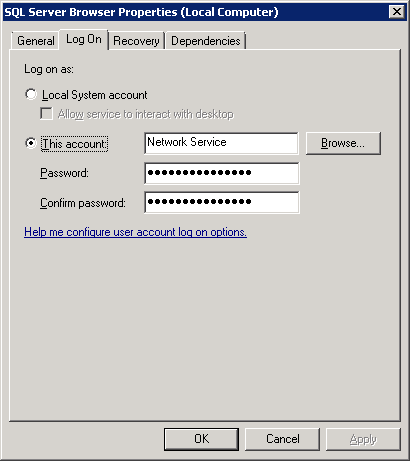
3.2.2 Sql Server Browser Service
-
Click "Start -> Administrative Tools -> Services", right click "SQL Server Browser" select "Properties"
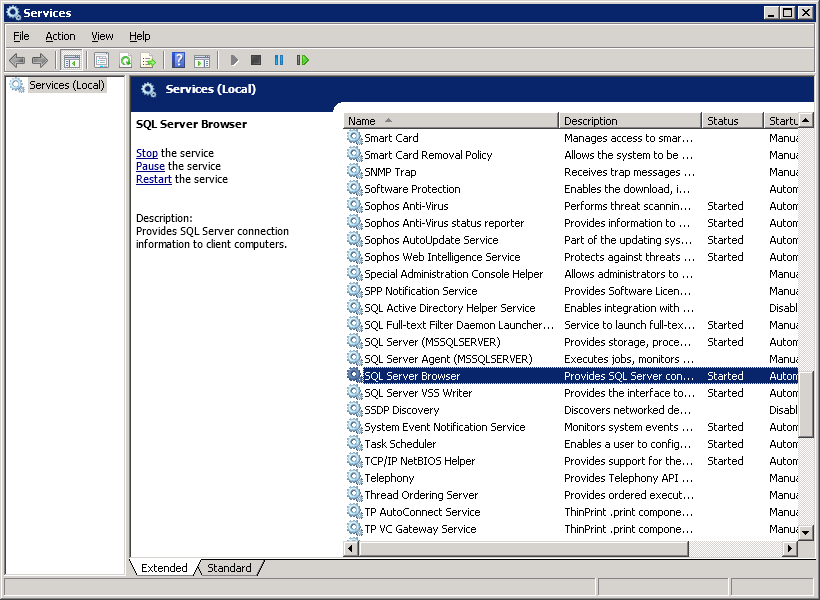
-
Tab "Log on" as "Built-in account -> Network Service [enter admin password]"
-
Tab "General" set startup type to automatic
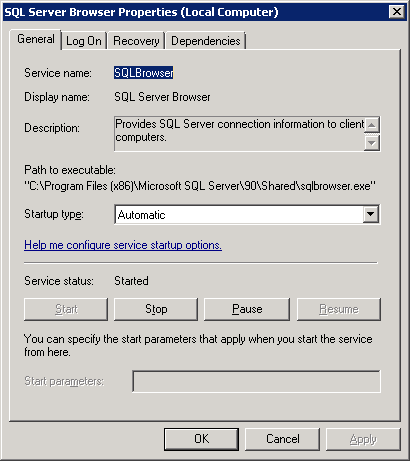
- Click apply, click ok
- In "Services" window, right click "SQL Server Browser -> Restart"
3.2.3 Sql Server Properties
-
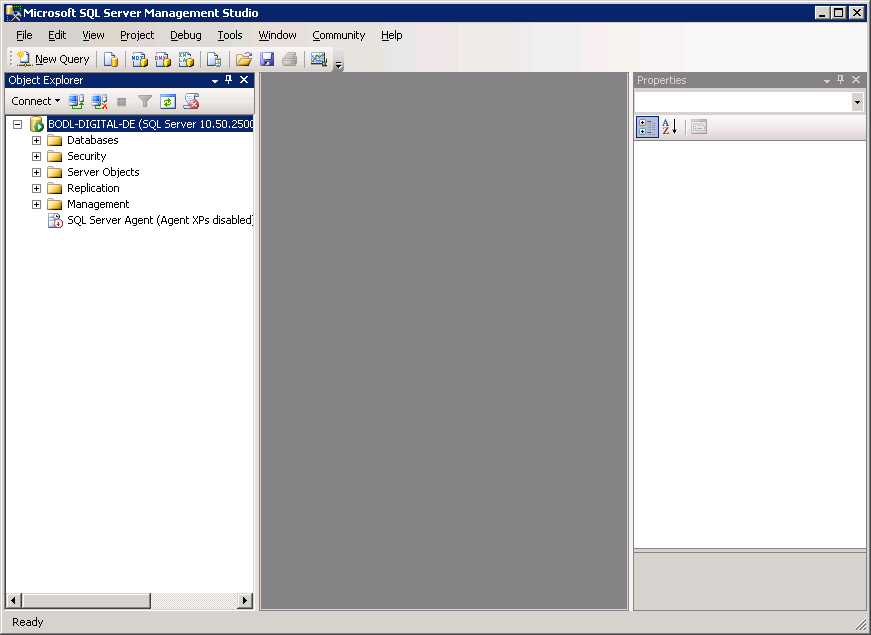
Run SQL Server Management Studio, connect to SQL Server instance, right click on server instance in left hand side pane, select "Properties"
- Click "Security" in left hand side pane
-
Select "Sql Server and Windows Authentication Mode"
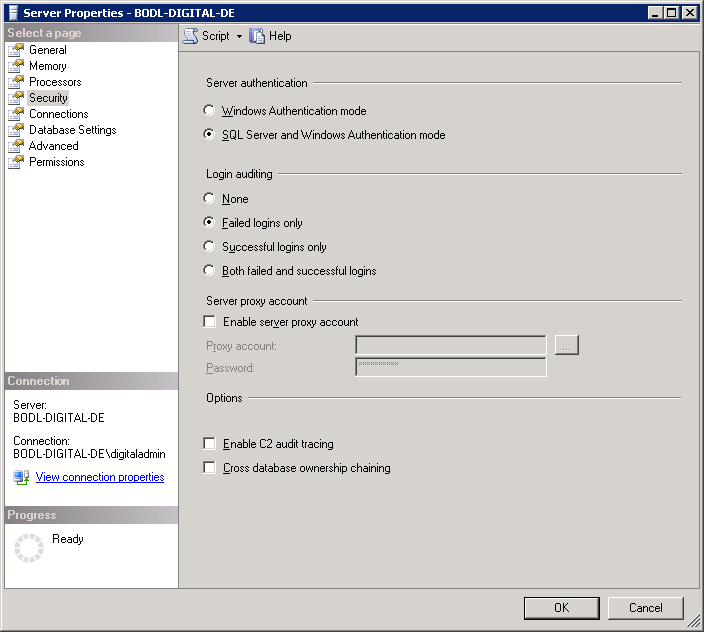
- Click "Connections" in left hand side pane
- Ensure "Allow remote connections to this server" is checked
- Click "Ok"
- Right click on server instance, select "Restart"
3.2.4 Restore iNQUIRE Database
-
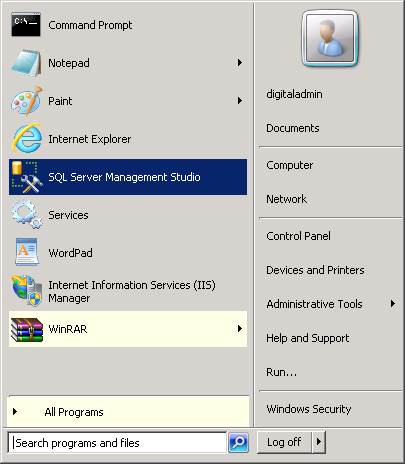
Start -> Sql Server Management Studio
-
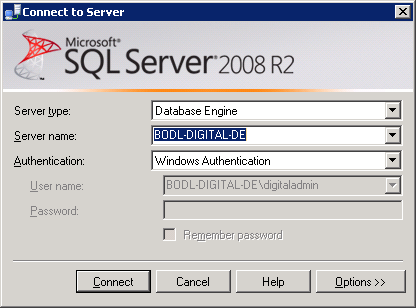
Connect to Sql Server
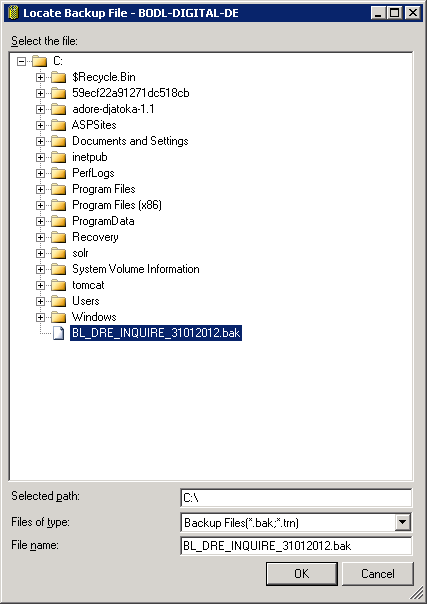
- Extract database .bak file from supplied zip/rar "INQUIRE_Lite"
- Copy database to easily accessible path, eg "C:\"
- Sql Server Management Studio, right click "Databases -> Restore Database"
- Select database from path above
- To database: INQUIRE_Lite
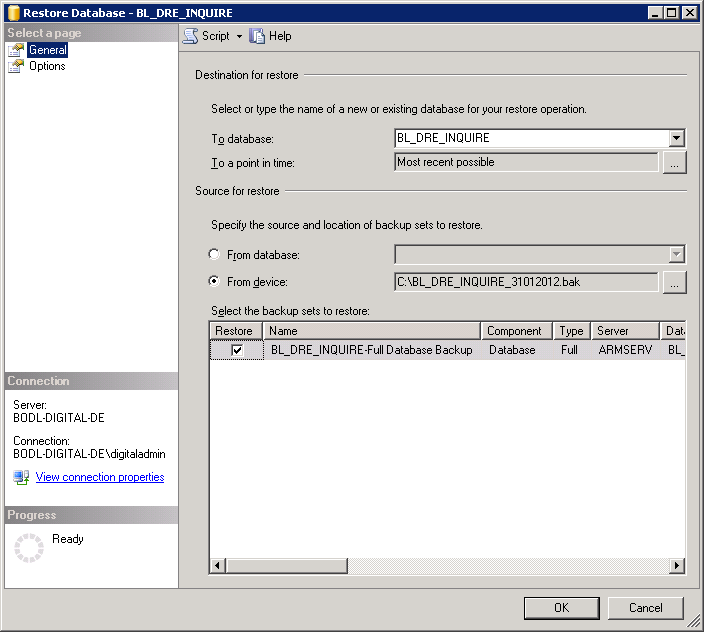
- In "Select the backup sets to restore" tick in restore column, should only be one set [see screenshot]
- Click "Ok"
3.2.5 Create a New User
-
Left pane, expand Security, right click Logins -> New Login
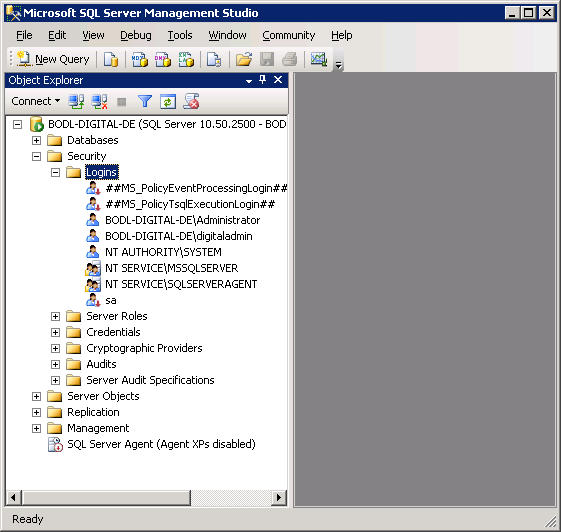
-
Login name "dreuser2"
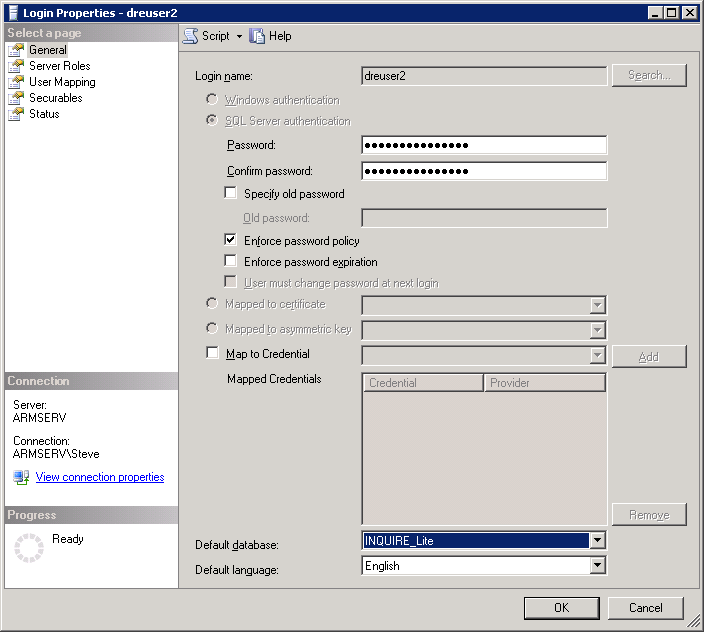
- Select Sql Server Authentication, password "[PASSWORD]"
- Untick "Enforce password expiration"
- Select Default database: INQUIRE_Lite
- If there are any issues with using login name "dreuser2", you can try "dreuser[x]" eg "dreuser3", as long as you update your ASP.net web.config with the login name, eg edit "C:\ASPSites\inquire\1.13\web.config" <connectionStrings> section, it may appear multipe times.
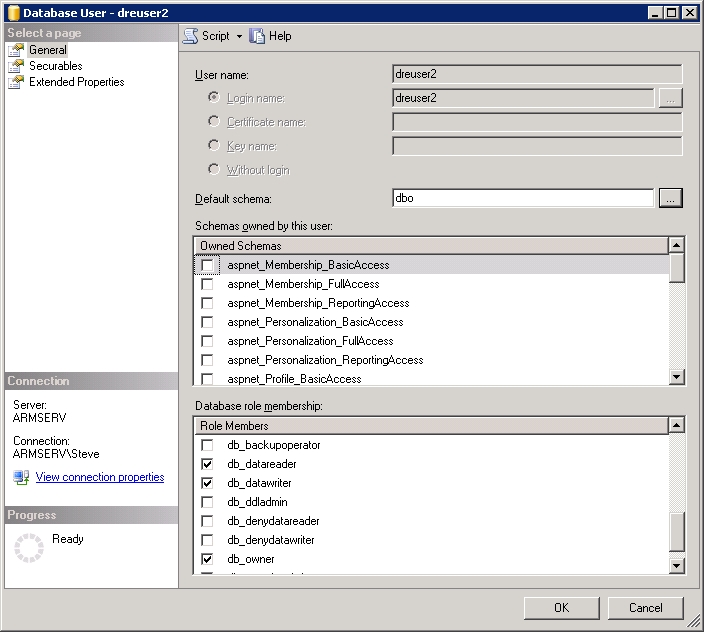
3.2.6 Add Users to Databases
- Left pane expand Databases, expand "INQUIRE_Lite", expand "Security", right click "Users -> New User"
- Username as created above eg "dreuser2"
- Login name eg "dreuser2"
-
Database role membership, tick: db_datareader, db_datawriter, db_owner
3.3 Solr
- Download latest version or unpack solr\solr-4.10.0.zip, copy contents of "example" directory to path with no spaces in name, eg "C:\solr"
- Set the SOLR_HOME enviroment variable (see Environment Variables)
- If upgrading from Solr v3 to v4 check configuration differences (see solr\solr_example_config.zip and http://myjeeva.com/upgrade-migrate-solr-3x-to-solr-4.html) and also the contents of supplied example "solr_config.zip" which would normally be found in "[solr install dir]\multicore\core1\conf"
- Duplicate initial core to other cores as required (allows flipping between cores so one can be re-populated/re-indexed in the background), eg copy contents of "[solr install dir]\multicore\core1\conf" to "[solr install dir]\multicore\core0\conf"
3.3.1 Running Solr via included server (Jetty)
- To run Solr on demand, with an output window (useful for debugging), copy solr\solr.bat to the Solr installation directory, update to reflect correct JRE path, Jetty/Solr port, etc, then run this batch file from the command line:
"%JAVA_HOME%\bin\java" -Dsolr.solr.home=%SOLR_HOME% -Djetty.port=8983 -jar c:\solr\start.jar
3.3.2 Running Solr via Jetty as a Windows Service (for full documentation see http://www.eclipse.org/jetty/documentation/current/startup-windows-service.html)
- Make "temp" directory in Solr installation path, eg "C:\solr\temp"
- Unpack supplied solr\commons-daemon-1.0.15-bin-windows.zip or download latest Apache Commons Daemon from http://www.apache.org/dist/commons/daemon/binaries/
- Copy prunmgr.exe and [system cpu architecture]\prunsrv.exe to Solr installation path eg "c:\solr"
- Copy solr\install-jetty-service.bat to the Solr installation directory, update the file to reflect the system configuration (see variables highlighted in red):
@echo off
set SOLR_BASE=C:\solr
set SERVICE_NAME=SolrService
set JETTY_HOME=%SOLR_BASE%
set JETTY_BASE=%SOLR_BASE%
set STOPKEY=inquire
set STOPPORT=50001

set PR_INSTALL=%SOLR_BASE%\prunsrv.exe

@REM Service Log Configuration
set PR_LOGPREFIX=%SERVICE_NAME%
set PR_LOGPATH=%SOLR_BASE%\logs
set PR_STDOUTPUT=auto
set PR_STDERROR=auto
set PR_LOGLEVEL=Debug

@REM Path to Java Installation
set PR_JVM=%JAVA_HOME%\jre\bin\server\jvm.dll
set PR_CLASSPATH=%JETTY_HOME%\start.jar;%JAVA_HOME%\lib\tools.jar

@REM JVM Configuration
set PR_JVMMS=128
set PR_JVMMX=512
set PR_JVMSS=4000
set PR_JVMOPTIONS=-Duser.dir="%JETTY_BASE%";-Djava.io.tmpdir="%SOLR_BASE%\temp";-Djetty.home="%JETTY_HOME%";-Djetty.base="%JETTY_BASE%";-Dsolr.solr.home="%SOLR_HOME%";-Djetty.port=8983
@REM Startup Configuration
set JETTY_START_CLASS=org.eclipse.jetty.start.Main

set PR_STARTUP=auto
set PR_STARTMODE=java
set PR_STARTCLASS=%JETTY_START_CLASS%
set PR_STARTPARAMS=STOP.KEY="%STOPKEY%";STOP.PORT=%STOPPORT%

@REM Shutdown Configuration
set PR_STOPMODE=java
set PR_STOPCLASS=%JETTY_START_CLASS%
set PR_STOPPARAMS=--stop;STOP.KEY="%STOPKEY%";STOP.PORT=%STOPPORT%;STOP.WAIT=10

%PR_INSTALL% //IS/%SERVICE_NAME% ^
  --DisplayName="%SERVICE_NAME%" ^
  --Install="%PR_INSTALL%" ^
  --Startup="%PR_STARTUP%" ^
  --LogPath="%PR_LOGPATH%" ^
  --LogPrefix="%PR_LOGPREFIX%" ^
  --LogLevel="%PR_LOGLEVEL%" ^
  --StdOutput="%PR_STDOUTPUT%" ^
  --StdError="%PR_STDERROR%" ^
  --JavaHome="%JAVA_HOME%" ^
  --Jvm="%PR_JVM%" ^
  --JvmMs="%PR_JVMMS%" ^
  --JvmMx="%PR_JVMMX%" ^
  --JvmSs="%PR_JVMSS%" ^
  --JvmOptions="%PR_JVMOPTIONS%" ^
  --Classpath="%PR_CLASSPATH%" ^
  --StartMode="%PR_STARTMODE%" ^
  --StartClass="%JETTY_START_CLASS%" ^
  --StartParams="%PR_STARTPARAMS%" ^
  --StopMode="%PR_STOPMODE%" ^
  --StopClass="%PR_STOPCLASS%" ^
  --StopParams="%PR_STOPPARAMS%"

if not errorlevel 1 goto installed
echo Failed to install "%SERVICE_NAME%" service.  Refer to log in %PR_LOGPATH%
goto end

:installed
echo The Service "%SERVICE_NAME%" has been installed

:end
- Run this batch file from the command line as an Administrator
3.4 iNQUIRE
- Edit "[iNQUIRE deployment path]\Web.config"
- Edit email settings
- Edit SolrUri settings (NB: SolrUriXml is redundant and can just point to any instance/core of Solr)
- XmlDataFile is deprecated
- MediaDirectoryRemote is for non Jpeg2000 media, can just be set to "/" if none exist, or create "Media" directory in deployment directory if needed
- ImageDirectory can be set to eg "C:\ASPSites\inquire\1.8\" if no non-jpeg2000 media, or point at non-jp2 media directory
- connectionStrings: DataSource should be Sql Server machine, eg localhost, user should be the username and password created in Sql Server management utility above:
<add name="BL_DRE_INQUIREConnectionString"
    connectionString="Data Source=BODL-DIGITAL-DE;Initial Catalog=BL_DRE_INQUIRE;Persist Security Info=True;User ID=dreuser2;Password=[PASSWORD]"
    providerName="System.Data.SqlClient" />"
NB: MS Sql Server seems to be happy with just eg "Data Source=BODL-DIGITAL-DE", but Sql Server Express needs [machine name]\[instance name] eg "Data Source=ACER-LAPTOP\SQLEXPRESS"
3.5 IIS
- Launch IIS, right click "Default Web Site -> Add Application"
- Alias: eg "inquire_1.8", Application pool: "ASP.NET v4.0", Physical path "[inquire deployment directory]", eg "C:\ASPSites\inquire\1.8"
3.6 Microsoft IIS Url Rewrite [Optional]
- Open web.config, copy rewrite section to default website web.config (usually in inetput/wwwroot) so rules are inherited by inquire site.
Then comment out the rewrite section in the inquire web.config. The default
website web.config should thus look similar to the following:
<?xml version="1.0" encoding="UTF-8"?>
    <configuration>
        <system.webServer>
            <rewrite>
                <rules>
                    <clear />
                        <rule name="inquire direct view item (ris export url)" patternSyntax="Wildcard" stopProcessing="false">
                            <match url="inquire/v/*" /> <conditions logicalGrouping="MatchAll" trackAllCaptures="false" />
                            <action type="Rewrite" url="inquire/Discover/Search/?p=c+0,t+,rsrs+0,rsps+10,fa+,so+id^desc,scids+,pid+,vi+{R:1}" appendQueryString="true" />
                        </rule>

                        <rule name="iNQUIRE" patternSyntax="Wildcard" stopProcessing="true">
                            <match url="inquire/*" negate="false" />
                            <conditions logicalGrouping="MatchAll" trackAllCaptures="false" />
                            <action type="Redirect" url="inquire_1.12/{R:1}" redirectType="Found" />
                        </rule>
                    </rules>
                </rewrite>
            </system.webServer>
        </configuration>